Did you know a pro pickleball machine can cost from $1,500 to over $5,000? For those on a budget, making your own pickleball machine is a great choice. This guide shows you how to make one that saves money and fits your training needs.
With a DIY machine, you can practice anytime without needing a partner or spending a lot. I’ll tell you what tools and materials you need, how to put it together, and why making your own is a good idea. It’s perfect for improving your skills or just having fun.
Key Takeaways
- The guide features six easy steps for making a homemade pickleball machine.
- Building a DIY machine is cheaper than buying a pro one.
- You can customize it to suit your skills and likes.
- A DIY machine can last years with little repair.
- Keeping it in good shape is key for the best play.
Understanding the Benefits of a DIY Pickleball Machine
Building a DIY pickleball machine has many perks. It makes practice sessions better for any pickleball fan. Knowing these benefits helps players pick the right training gear.
Cost-Effectiveness Compared to Store-Bought Machines
One big plus is saving money by making my own machine. Machines from stores can be very expensive, costing thousands of dollars. But, I can make a good machine with cheap parts and pickleball machine plans. This is great for those watching their budget, as it cuts costs without losing key features.
Customization for Specific Training Needs
Another big plus is being able to customize my machine. By making my own pickleball robot, I can set it up just how I need it. I can change the ball speed, angle, or drills to fit my training goals. This makes my practice sessions more effective.
Convenience of Practicing Anytime
Having my own machine means I can practice whenever I like. I don’t have to plan for a specific time at a gym or rental place. This lets me practice whenever I feel like it, helping me get better faster.

| Feature | DIY Pickleball Machine | Store-Bought Machine |
|---|---|---|
| Cost | Lower initial investment | Higher initial price |
| Customization | Flexible design options | Limited modifications |
| Convenience | Accessible anytime | Dependent on rental availability |
| Maintenance | Owner can control upkeep | Service may be required |
Essential Tools and Materials Required
Making a DIY pickleball machine needs the right tools and materials. Having the right tools and materials makes building easier. This part will talk about the key tools and materials I used. It will also cover some extra features to make your machine better.
List of Tools Needed
- Saw (circular or jigsaw) for cutting wood
- Drill for creating holes and driving screws
- Clamps to secure pieces in place
- Screwdriver set for assembly
- Measuring tape for accurate dimensions
- Level to ensure everything is straight
- Safety goggles and gloves for protection
Materials for Construction
For building, you’ll need these parts:
- Wood (like plywood or 2x4s) for the frame
- Screws to hold the wood together
- Electric motor to move the pickleballs
- Switches for different settings
- Buckets or trays for the pickleballs
Optional Features to Enhance Your Machine
To make your machine better, think about adding:
- Adjustable settings for speed and angle
- A remote control for easy use
- Upgraded motors for better reliability
- Advanced control systems for custom shots

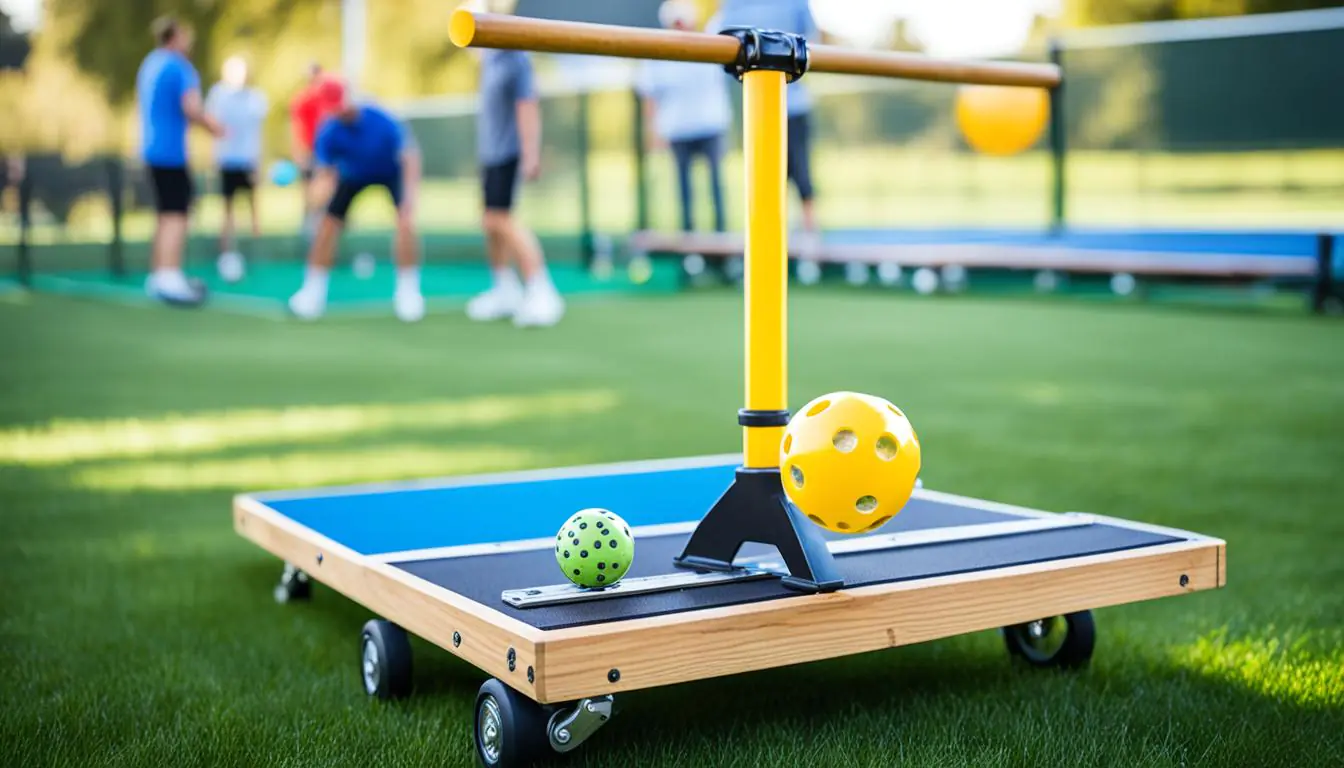
How to Build a Pickleball Machine
Building a pickleball machine at home is fun and saves money. It lets you make your training fit your needs. This guide will show you how to make your own machine easily.
Step-by-Step Instructions for Construction
First, collect all the materials and tools you need. Cut the wood for the frame first. Then, put the frame together so it’s strong.
Next, wire the electronic parts. This means connecting the motor and setting up the controller for remote use. You can also add features like spin control and settings you can change.
For more help, check out this comprehensive guide. It has instructions on how to use and program your machine.
Safety Tips During Construction
Keeping safe is key when you’re doing DIY projects. Here are important safety tips for DIY projects:
- Always wear protective gear, such as goggles and gloves.
- Use tools safely, following the instructions from the maker.
- Make sure all electrical parts are connected well to avoid dangers.
- Don’t use power tools if you’re tired or not paying attention.
- Keep your work area tidy to avoid accidents.

Choosing the Right Design for Your Pickleball Machine
Choosing the right design for a pickleball machine makes practicing better. Knowing the different types helps you find one that fits your training needs. I’ll look at the differences between static and mobile machines and what to think about when choosing.
Static vs. Mobile Designs
When picking a pickleball serving machine, think about static or mobile designs. Here’s what makes each one special:
- Static Designs: These machines are heavy and need a special spot. They give you stability and lots of features for controlled practice. But, they’re not easy to move around.
- Mobile Pickleball Machines: These are light and easy to carry anywhere. They’re perfect for players who like to practice wherever they go. They’re flexible but might not be as stable as static machines.
Factors to Consider in Your Design
Think about these things when making a pickleball machine:
- Ball Capacity: A good machine should hold 100 to 150 balls for good practice. The Pickleball Tutor Plus Ultra can hold up to 110 balls, and the ERNE Stealth Black can hold over 150.
- Speed Options: Being able to change shot speeds helps with different levels of training. The Pickle Champion by Lobster can go up to 65 mph, giving you lots of options.
- Portability: If you’ll be moving your machine a lot, pick a light one. The Spinshot Pickleball Machine is made for easy carrying, making it very convenient.
- Battery Life: Choose machines with long battery life for more practice time. The Pickle Two by Lobster can last 6 to 8 hours on a single charge.
Electric Components and Power Supply Information
Powering a pickleball machine needs careful thought on electric parts. I’ll help you pick the right motor and keep power safe. Choosing good parts makes the machine work better and last longer.
Selecting the Right Motor and Battery
The heart of a pickleball machine is its motor selection. You need a motor that fits the machine’s design and your training goals. The Slinger Bag uses motors that go from 10mph to 45mph, great for all skill levels.
Pair this motor with a lithium-ion battery that charges fast. This battery turns to ‘pulse’ mode when full, saving energy and keeping you safe.
Connecting the Power Supply Safely
It’s key to keep power safe when setting up. Follow the manual’s safety tips to avoid electrical shocks or short circuits. Make sure all wires meet the maker’s specs for handling loads.
Check the wires often to keep your machine working well. Paying attention to wiring and checking it regularly makes your machine reliable.
For a full guide on making a ball launcher, check out these resources. You can find more info here.
Personalizing Your Homemade Pickleball Machine
Making your own pickleball machine can change how you practice. It’s key to set it up right for better training and better play. You can change the speed and angle to work on different skills like volleys or serves.
These machines go from 10 to 60 miles per hour. So, you can pick a speed that’s just right for you.
Customizing Speed and Angle Settings
Changing the speed and angle makes training better. It lets you practice like you’re in a real game. You can make the ball spin like in a match.
Some machines, like the Oncourt Offcourt Pickleball Tutor Spin Machine, have 20 lines of oscillation. This helps you work on quick reactions.
Aesthetics: Painting and Finishing Touches
Looks matter too. Adding your own style to your pickleball machine makes it special. You can paint it bright colors or add decals.
Choosing colors that show your style or adding a logo can make practice fun. It makes you more excited to play.
Conclusion
Building a DIY pickleball machine is super helpful for players at all levels. It’s cheaper than buying a commercial one and lets you customize it for your needs. You can practice anytime, which is great for making the most of your court time.
The guide shows you can make it with simple tools and materials. This makes it easy for anyone who wants to get better at pickleball. By making your own machine, you can practice more and improve your skills.
This project is not just about making a machine. It’s about feeling proud of what you’ve made. With this DIY project, you can really boost your pickleball skills. I suggest everyone try making their own pickleball machine. It’s a big step towards reaching your goals on the court.